4 Week 3- Working with Files Part 2
We now know how to switch directories, run programs, look at the contents of directories and files, but how do we manipulate files?
4.1 Main Objectives
- Learn how to create, copy and delete files/directories
- Learn how to modify permissions for a file
- Construct command pipelines with two or more stages
- Use
forloops to run the same command for several input files. - Practice writing scripts to work with data in terminal
4.2 Creating, moving, copying, and removing
Now we can move around in the file structure, look at files, and search files. But what if we want to copy files or move them around or get rid of them? Most of the time, you can do these sorts of file manipulations without the command line, but there will be some cases (like when you’re working with a remote computer like we are for this lesson) where it will be impossible. You’ll also find that you may be working with hundreds of files and want to do similar manipulations to all of those files. In cases like this, it’s much faster to do these operations at the command line.
4.2.1 Copying Files
When working with computational data, it’s important to keep a safe copy of that data that can’t be accidentally overwritten or deleted. For this lesson, our raw data is our FASTQ files. We don’t want to accidentally change the original files, so we’ll make a copy of them and change the file permissions so that we can read from, but not write to, the files.
First, let’s make a copy of one of our FASTQ files using the cp command.
Navigate to the your directory, then move into your Week2/untrimmed_fastq directory with the fastq files we worked with last week. Once you are there, type:
We now have two copies of the SRR098026.fastq file, one of them named SRR098026-copy.fastq. We’ll move this file to a new directory
called backup where we’ll store our backup data files.
4.2.2 Creating Directories
The mkdir command is used to make a directory. Enter mkdir
followed by a space, then the directory name you want to create.
4.2.3 Moving / Renaming
We can now move our backup file to this directory. We can
move files around using the command mv:
The mv command is also how you rename files. Let’s rename this file to make it clear that this is a backup:
4.2.4 File Permissions
We’ve now made a backup copy of our file, but just because we have two copies, it doesn’t make us safe. We can still accidentally delete or overwrite both copies. To make sure we can’t accidentally mess up this backup file, we’re going to change the permissions on the file so that we’re only allowed to read (i.e. view) the file, not write to it (i.e. make new changes).
View the current permissions on a file using the -l (long) flag for the ls command:
The first part of the output for the -l flag gives you information about the file’s current permissions. There are ten slots in the
permissions list. The first character in this list is related to file type, not permissions, so we’ll ignore it for now. The next three
characters relate to the permissions that the file owner has, the next three relate to the permissions for group members, and the final
three characters specify what other users outside of your group can do with the file. We’re going to concentrate on the three positions
that deal with your permissions (as the file owner).
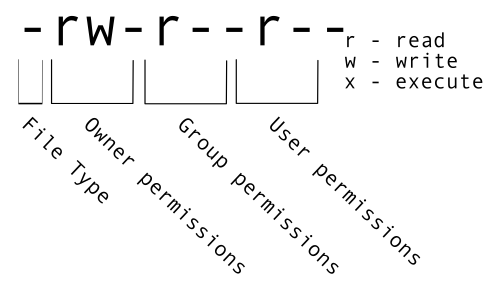
Here the three positions that relate to the file owner are rw-. The r means that you have permission to read the file, the w
indicates that you have permission to write to (i.e. make changes to) the file, and the third position is a -, indicating that you
don’t have permission to carry out the ability encoded by that space (this is the space where x or executable ability is stored.
Our goal for now is to change permissions on this file so that you no longer have w or write permissions. We can do this using the chmod (change mode) command and subtracting (-) the write permission -w.
Chmod can also change the permission to only the user (u), group (g), and/or other (o). Let’s add reading (r), writing (x), and execute (x) permissions to user group.
4.2.5 Removing
To prove to ourselves that you no longer have the ability to modify this file, try deleting it with the rm command:
You’ll be asked if you want to override your file permissions:
You should enter n for no. If you enter n (for no), the file will not be deleted. If you enter y, you will delete the file. This gives us an extra
measure of security, as there is one more step between us and deleting our data files.
Important: The rm command permanently removes the file. Be careful with this command. It doesn’t just nicely put the files in the Trash. They’re really gone.
By default, rm will not delete directories. You can tell rm to
delete a directory using the -r (recursive) option. Let’s delete the backup directory
we just made.
Enter the following command:
This will delete not only the directory, but all files within the directory. If you have write-protected files in the directory, you will be asked whether you want to override your permission settings.
Class Exercise 1
Starting in ‘yourdirectory’, navigate to ‘cd /week2/untrimmed_fastq’ and do the following:
Make sure that you have deleted your backup directory and all files it contains since we are going to do it again but with less commands!
Create a backup of each of your FASTQ files using
cp. (Note: You’ll need to do this individually for each of the two FASTQ files. We haven’t earned yet how to do this with a wildcard.)Use a wildcard to move all of your backup files to a new backup directory.
Change the permissions on all of your backup files to be write-protected.
4.3 Searching files
We discussed in a previous episode how to search within a file using less. We can also
search within files without even opening them, using grep. grep is a command-line
utility for searching plain-text files for lines matching a specific set of
characters (sometimes called a string) or a particular pattern
(which can be specified using something called regular expressions). We’re not going to work with
regular expressions in this lesson, and are instead going to specify the strings
we are searching for.
Let’s give it a try!
Nucleotide abbreviations
The four nucleotides that appear in DNA are abbreviated
A,C,TandG. Unknown nucleotides are represented with the letterN. AnNappearing in a sequencing file represents a position where the sequencing machine was not able to confidently determine the nucleotide in that position. You can think of anNas being aNy nucleotide at that position in the DNA sequence.
We’ll search for strings inside of our fastq files. Let’s first make sure we are in the correct directory:
Suppose we want to see how many reads in our file have really bad segments containing 10 consecutive unknown nucleotides (Ns).To determine the quality of our data, we’re going to be manually searching for strings of Ns within our sequence results to illustrate some principles of file searching. It can be really useful to do this type of searching to get a feel for the quality of your sequencing results, however, in your research you will most likely use a bioinformatics tool that has a built-in program for filtering out low-quality reads. You’ll learn how to use one such tool in a later lesson.
Let’s search for the string NNNNNNNNNN in the SRR098026 file:
This command returns a lot of output to the terminal. Every single line in the SRR098026 file that contains at least 10 consecutive Ns is printed to the terminal, regardless of how long or short the file is. We may be interested not only in the actual sequence which contains this string, but in the name (or identifier) of that sequence. We discussed in a previous lesson that the identifier line immediately precedes the nucleotide sequence for each read in a FASTQ file. We may also want to inspect the quality scores associated with each of these reads. To get all of this information, we will return the line immediately before each match and the two lines immediately after each match.
We can use the -B argument for grep to return a specific number of lines before
each match. The -A argument returns a specific number of lines after each matching line. Here we want the line before and the two lines after each
matching line, so we add -B1 -A2 to our grep command:
One of the sets of lines returned by this command is:
@SRR098026.177 HWUSI-EAS1599_1:2:1:1:2025 length=35
CNNNNNNNNNNNNNNNNNNNNNNNNNNNNNNNNNN
+SRR098026.177 HWUSI-EAS1599_1:2:1:1:2025 length=35
#!!!!!!!!!!!!!!!!!!!!!!!!!!!!!!!!!!
Class Exercise 2
Search for the sequence
GNATNACCACTTCCin theSRR098026.fastqfile. Have your search return all matching lines and the name (or identifier) for each sequence that contains a match.Search for the sequence
AAGTTin both FASTQ files. Have your search return all matching lines and the name (or identifier) for each sequence that contains a match.
4.4 Redirecting output
grep allowed us to identify sequences in our FASTQ files that match a particular pattern.
All of these sequences were printed to our terminal screen, but in order to work with these
sequences and perform other operations on them, we will need to capture that output in some
way.
We can do this with something called “redirection”. The idea is that we are taking what would ordinarily be printed to the terminal screen and redirecting it to another location. In our case, we want to print this information to a file so that we can look at it later and use other commands to analyze this data.
The command for redirecting output to a file is >.
Let’s try out this command and copy all the records (including all four lines of each record)
in our FASTQ files that contain
‘NNNNNNNNNN’ to another file called bad_reads.txt.
4.5 File extensions
You might be confused about why we’re naming our output file with a .txt extension. After all, it will be holding FASTQ formatted data that we’re extracting from our FASTQ files. Won’t it also be a FASTQ file? The answer is, yes - it will be a FASTQ file and it would make sense to name it with a .fastq extension. However, using a .fastq extension will lead us to problems when we move to using wildcards later in this episode. We’ll point out where this becomes important. For now, it’s good that you’re thinking about file extensions!
The prompt should sit there a little bit, and then it should look like nothing
happened. But type ls. You should see a new file called bad_reads.txt.
We can check the number of lines in our new file using a command called wc.
wc stands for word count. This command counts the number of words, lines, and characters
in a file. The FASTQ file may change over time, so given the potential for updates we are using a file downloaded in 2020.
The command wc gives the following output:
This will tell us the number of lines, words and characters in the file. If we
want only the number of lines, we can use the -l flag for lines.
We might want to search multiple FASTQ files for sequences that match our search pattern.
However, we need to be careful, because each time we use the > command to redirect output
to a file, the new output will replace the output that was already present in the file.
This is called “overwriting” and, just like you don’t want to overwrite your video recording
of your kid’s first birthday party, you also want to avoid overwriting your data files.
Here, the output of our second call to wc shows that we no longer have any lines in our bad_reads.txt file. This is
because the second file we searched (SRR097977.fastq) does not contain any lines that match our
search sequence. So our file was overwritten and is now empty.
We can avoid overwriting our files by using the command >>. >> is known as the “append redirect” and will
append new output to the end of a file, rather than overwriting it.
The output of our second call to wc shows that we have not overwritten our original data.
We can also do this with a single line of code by using a wildcard:
File extensions - part 2
This is where we would have trouble if we were naming our output file with a
.fastqextension. If we already had a file calledbad_reads.fastq(from our previousgreppractice) and then ran the command above using a.fastqextension instead of a.txtextension,grepwould give us a warning.
grepis letting you know that the output filebad_reads.fastqis also included in yourgrepcall because it matches the*.fastqpattern. Be careful with this as it can lead to some unintended results.
Since we might have multiple different criteria we want to search for,
creating a new output file each time has the potential to clutter up our workspace. We also
thus far haven’t been interested in the actual contents of those files, only in the number of
reads that we’ve found. We created the files to store the reads and then counted the lines in
the file to see how many reads matched our criteria. There’s a way to do this, however, that
doesn’t require us to create these intermediate files - the pipe command (|).
What | does is take the output that is scrolling by on the terminal and uses that output as input to another command.
When our output was scrolling by, we might have wished we could slow it down and
look at it, like we can with less. Well it turns out that we can! We can redirect our output
from our grep call through the less command.
We can now see the output from our grep call within the less interface. We can use the up and down arrows
to scroll through the output and use q to exit less.
If we don’t want to create a file before counting lines of output from our grep search, we could directly pipe
the output of the grep search to the command wc -l. This can be helpful for investigating your output if you are not sure
you would like to save it to a file.
Because we asked grep for all four lines of each FASTQ record, we need to divide the output by
four to get the number of sequences that match our search pattern. Since 802 / 4 = 200.5 and we
are expecting an integer number of records, there is something added or missing in bad_reads.txt.
If we explore bad_reads.txt using less, we might be able to notice what is causing the uneven
number of lines. Luckily, this issue happens by the end of the file so we can also spot it with tail.
@SRR098026.133 HWUSI-EAS1599_1:2:1:0:1978 length=35
ANNNNNNNNNTTCAGCGACTNNNNNNNNNNGTNGN
+SRR098026.133 HWUSI-EAS1599_1:2:1:0:1978 length=35
#!!!!!!!!!##########!!!!!!!!!!##!#!
--
--
@SRR098026.177 HWUSI-EAS1599_1:2:1:1:2025 length=35
CNNNNNNNNNNNNNNNNNNNNNNNNNNNNNNNNNN
+SRR098026.177 HWUSI-EAS1599_1:2:1:1:2025 length=35
#!!!!!!!!!!!!!!!!!!!!!!!!!!!!!!!!!!
The fifth and six lines in the output display “–” which is the default action for grep to separate groups of
lines matching the pattern, and indicate groups of lines which did not match the pattern so are not displayed.
To fix this issue, we can redirect the output of grep to a second instance of grep as follows.
+SRR098026.132 HWUSI-EAS1599_1:2:1:0:320 length=35
#!!!!!!!!!##########!!!!!!!!!!##!#!
@SRR098026.133 HWUSI-EAS1599_1:2:1:0:1978 length=35
ANNNNNNNNNTTCAGCGACTNNNNNNNNNNGTNGN
+SRR098026.133 HWUSI-EAS1599_1:2:1:0:1978 length=35
#!!!!!!!!!##########!!!!!!!!!!##!#!
@SRR098026.177 HWUSI-EAS1599_1:2:1:1:2025 length=35
CNNNNNNNNNNNNNNNNNNNNNNNNNNNNNNNNNN
+SRR098026.177 HWUSI-EAS1599_1:2:1:1:2025 length=35
#!!!!!!!!!!!!!!!!!!!!!!!!!!!!!!!!!!
The -v option in the second grep search stands for --invert-match meaning grep will now only display the
lines which do not match the searched pattern, in this case '^--'. The caret (^) is an anchoring
character matching the beginning of the line, and the pattern has to be enclose by single quotes so grep does
not interpret the pattern as an extended option (starting with –).
Custom
grepcontrolUse
man grepto read more about other options to customize the output ofgrepincluding extended options, anchoring characters, and much more.
Redirecting output is often not intuitive, and can take some time to get used to. Once you’re comfortable with redirection, however, you’ll be able to combine any number of commands to do all sorts of exciting things with your data!
None of the command line programs we’ve been learning do anything all that impressive on their own, but when you start chaining them together, you can do some really powerful things very efficiently.
4.6 Writing for loops
Loops are key to productivity improvements through automation as they allow us to execute commands repeatedly. Similar to wildcards and tab completion, using loops also reduces the amount of typing (and typing mistakes). Loops are helpful when performing operations on groups of sequencing files, such as unzipping or trimming multiple files. We will use loops for these purposes in subsequent analyses, but will cover the basics of them for now.
When the shell sees the keyword for, it knows to repeat a command (or group of commands) once for each item in a list.
Each time the loop runs (called an iteration), an item in the list is assigned in sequence to the variable, and
the commands inside the loop are executed, before moving on to the next item in the list. Inside the loop, we call for
the variable’s value by putting $ in front of it. The $ tells the shell interpreter to treat the variable
as a variable name and substitute its value in its place, rather than treat it as text or an external command. In shell programming, this is usually called “expanding” the variable.
Sometimes, we want to expand a variable without any whitespace to its right.
Suppose we have a variable named foo that contains the text abc, and would
like to expand foo to create the text abcEFG.
The interpreter is trying to expand a variable named fooEFG, which (probably)
doesn’t exist. We can avoid this problem by enclosing the variable name in
braces ({ and }, sometimes called “squiggle braces”). bash treats the #
character as a comment character. Any text on a line after a # is ignored by
bash when evaluating the text as code.
Let’s write a for loop to show us the first two lines of the fastq files we downloaded earlier. You will notice the shell prompt changes from $ to > and back again as we were typing in our loop. The second prompt, >, is different to remind us that we haven’t finished typing a complete command yet. A semicolon, ;, can be used to separate two commands written on a single line.
The for loop begins with the formula for <variable> in <group to iterate over>. In this case, the word filename is designated
as the variable to be used over each iteration. In our case SRR097977.fastq and SRR098026.fastq will be substituted for filename
because they fit the pattern of ending with .fastq in the directory we’ve specified. The next line of the for loop is do. The next line is
the code that we want to execute. We are telling the loop to print the first two lines of each variable we iterate over. Finally, the
word done ends the loop.
After executing the loop, you should see the first two lines of both fastq files printed to the terminal. Let’s create a loop that will save this information to a file.
When writing a loop, you will not be able to return to previous lines once you have pressed Enter. Remember that we can cancel the current command using
- Ctrl+C
If you notice a mistake that is going to prevent your loop for executing correctly.
Note that we are using >> to append the text to our seq_info.txt file. If we used >, the seq_info.txt file would be rewritten
every time the loop iterates, so it would only have text from the last variable used. Instead, >> adds to the end of the file.
4.7 Using Basename in for loops
Basename is a function in UNIX that is helpful for removing a uniform part of a name from a list of files. In this case, we will use basename to remove the .fastq extension from the files that we’ve been working with.
We see that this returns just the SRR accession, and no longer has the .fastq file extension on it.
If we try the same thing but use .fasta as the file extension instead, nothing happens. This is because basename only works when it exactly matches a string in the file.
Basename is really powerful when used in a for loop. It allows to access just the file prefix, which you can use to name things. Let’s try this.
Inside our for loop, we create a new name variable. We call the basename function inside the parenthesis, then give our variable name from the for loop, in this case ${filename}, and finally state that .fastq should be removed from the file name. It’s important to note that we’re not changing the actual files, we’re creating a new variable called name. The line > echo $name will print to the terminal the variable name each time the for loop runs. Because we are iterating over two files, we expect to see two lines of output.
If we want to print the file prefix of all of the .txt files in our current directory, we would run the following code:
One way this is really useful is to move files. Let’s rename all of our .txt files using mv so that they have the years on them, which will document when we created them.
$ for filename in *.txt
> do
> name=$(basename ${filename} .txt)
> mv ${filename}  ${name}_2019.txt
> done
What if we put the wrong year and actually want to remove the 2019 from all of our .txt files?
 $ for filename in *_2019.txt
> do
> name=$(basename ${filename} _2019.txt)
> mv ${filename} ${name}.txt
> done
Now write your own for loop it to have _2025 at the end of each of our .txt files!
4.8 Writing Scripts and Working with Data
We’ve been able to do a lot of work with files that already exist, but what if we want to write our own files? We’re not going to type in a FASTA file, but we’ll see as we go through other tutorials, there are a lot of reasons we’ll want to write a file, or edit an existing file.
To add text to files, we’re going to use a text editor called Nano. We’re going to create a file to take notes about what we’ve been doing with the data files in ~/group/rbaygrp/eve198-genomics/yourdirectory/Week2/untrimmed_fastq.
This is good practice when working in bioinformatics. We can create a file called README.txt that describes the data files in the directory or documents how the files in that directory were generated. As the name suggests, it’s a file that we or others should read to understand the information in that directory.
Let’s change our working directory to ~/group/rbaygrp/eve198-genomics/yourdirectory/Week2/untrimmed_fastq using cd,
then run nano to create a file called README.txt:
You should see something like this:
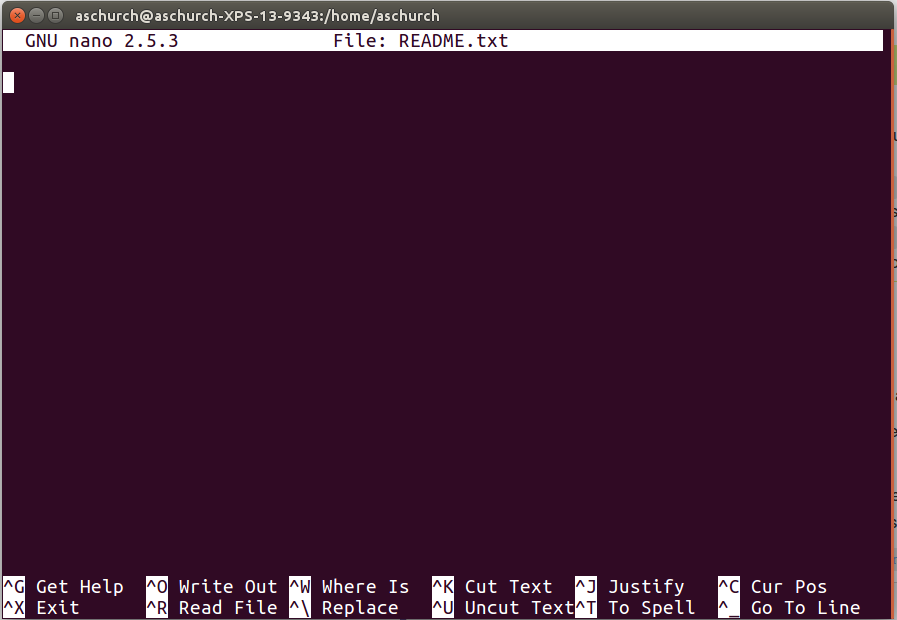
The text at the bottom of the screen shows the keyboard shortcuts for performing various tasks in nano. We will talk more about how to interpret this information soon.
Which Editor?
Which Editor?
When we say, “
nanois a text editor,” we really do mean “text”: it can only work with plain character data, not tables, images, or any other human-friendly media. We use it in examples because it is one of the least complex text editors. However, because of this trait, it may not be powerful enough or flexible enough for the work you need to do after this workshop. On Unix systems (such as Linux and Mac OS X), many programmers use Emacs or Vim (both of which require more time to learn), or a graphical editor such as Gedit. On Windows, you may wish to use Notepad++. Windows also has a built-in editor callednotepadthat can be run from the command line in the same way asnanofor the purposes of this lesson.No matter what editor you use, you will need to know where it searches for and saves files. If you start it from the shell, it will (probably) use your current working directory as its default location. If you use your computer’s start menu, it may want to save files in your desktop or documents directory instead. You can change this by navigating to another directory the first time you “Save As…”
Let’s type in a few lines of text. Describe what the files in this
directory are or what you’ve been doing with them.
Once we’re happy with our text, we can press Ctrl-O (press the Ctrl or Control key and, while
holding it down, press the O key) to write our data to disk. You’ll be asked what file we want to save this to:
press Return to accept the suggested default of README.txt.
Once our file is saved, we can use Ctrl-X to quit the editor and return to the shell.
Control, Ctrl, or ^ Key
The Control key is also called the “Ctrl” key. There are various ways in which using the Control key may be described. For example, you may see an instruction to press the Ctrl key and, while holding it down, press the X key, described as any of:
Control-XControl+XCtrl-XCtrl+X^XC-xIn
nano, along the bottom of the screen you’ll see^G Get Help ^O WriteOut. This means that you can use Ctrl-G to get help and Ctrl-O to save your file.
Now you’ve written a file. You can take a look at it with less or cat, or open it up again and edit it with nano.
4.9 Writing scripts: Bash
A really powerful thing about the command line is that you can write scripts. Scripts let you save commands to run them and also lets you put multiple commands together. Though writing scripts may require an additional time investment initially, this can save you time as you run them repeatedly. Scripts can also address the challenge of reproducibility: if you need to repeat an analysis, you retain a record of your command history within the script.
One thing we will commonly want to do with sequencing results is pull out bad reads and write them to a file to see if we can figure out what’s going on with them. We’re going to look for reads with long sequences of N’s like we did before, but now we’re going to write a script, so we can run it each time we get new sequences, rather than type the code in by hand each time.
We’re going to create a new file to put this command in. We’ll call it bad-reads-script.sh. The sh isn’t required, but using that extension tells us that it’s a shell script.
Bad reads have a lot of N’s, so we’re going to look for NNNNNNNNNN with grep. We want the whole FASTQ record, so we’re also going to get the one line above the sequence and the two lines below. We also want to look in all the files that end with .fastq, so we’re going to use the * wildcard.
Custom
grepcontrolWe introduced the
-voption in the previous lesson, now we are using-hto “Suppress the prefixing of file names on output” according to the documentation shown byman grep.
Type your grep command into the file and save it as before. Be careful that you did not add the $ at the beginning of the line.
Now comes the neat part. We can run this script. Type:
It will look like nothing happened, but now if you look at scripted_bad_reads.txt, you can see that there are now reads in the file.
If we want our ‘bad-reads-script.sh’ to tell us when it is done running, we can add this line at the end:
If you run the bash bad-reads-script.sh command again and it will print out “Script finished!”
4.10 Writing scripts: Slurm
You can also write scripts using a resource manager called “Slurm” (It is a reference to the show Futurama where there is a soda called slurm). Slurm can be really helpful for writing scripts and submitting jobs since you can schedule and run larger jobs. I use this personally in my own research. The set up is pretty similar. First let’s create a simple script:
For a slurm script we need more information in the header of our script so that it knows what account to run on and the amount of time you want to give to your job:
- All scripts start with
#!/bin/bash - The next line is your email address so you can get an email when your job finishes
- Then add information on if you want an email for all notifications (began, ended, failed, etc)
- Next is the name of the job, or job ID
- The name of your error log file
- The name of your output log file (usually the same name as your error)
- The number of processors per task
- The minimum number of nodes you need for your job. Small jobs don’t need a lot of nodes/memory
- The amount of memory for your job
- The requested time for your job. Some jobs take a really long time, I had one run for several months! For this class you only need to put in 90 minutes.
- The partition to submit to, high2 is the one we will be using
After those headers you write out your script!
#!/bin/bash
#SBATCH --mail-user=mlarmstrong@ucdavis.edu         # YOUR EMAIL ADDRESS
#SBATCH --account=rbay-eve198-genomics-grp    #we need this to specify what account we are using
#SBATCH --mail-type=ALL                         # NOTIFICATIONS OF SLURM JOB STATUS - ALL, NONE, BEGIN, END, FAIL, REQUEUE
#SBATCH -J HelloWorld                           # JOB ID
#SBATCH -e HelloWorld.j%j.err                   # STANDARD ERROR FILE TO WRITE TO
#SBATCH -o HelloWorld.j%j.out                   # STANDARD OUTPUT FILE TO WRITE TO
#SBATCH -c 1                                    # NUMBER OF PROCESSORS PER TASK
#SBATCH --ntasks=1                              # MINIMUM NUMBER OF NODES TO ALLOCATE TO JOB
#SBATCH --mem=1Gb                               # MEMORY POOL TO ALL CORES
#SBATCH --time=00-00:11:00                      # REQUESTED WALL TIME
#SBATCH -p high2                               # PARTITION TO SUBMIT TO

echo "Hello World!" > hello_world_output.txt
Then when you are ready to run your job you type
Want to check the status of your job? Type squeue -uyourusernameOnce your job is done, typels. There should be a new text file in your directory calledhello_world_output.txt`. What does it say?
More information on slurm scripts in on the hpc webpage: https://hpc.ucdavis.edu/faq/slurm
4.11 Group Work Activity- Writing your own script
modified from https://www.cyberciti.biz/faq/hello-world-bash-shell-script/
Now let’s work in small groups to write our own slurm scripts. The script should be called “hello.sh” and you want it to write a text file that says “Hello World! Isn’t genomics so fun?”
Remember your script should start with #!/bin/bash. Submit a copy of your script on canvas under the ‘Assignments’ tab for ‘Week 3: Writing your own script’.
4.12 Key Points
The commands
cp,mv, andmkdirare useful for manipulating existing files and creating new directories.You can view file permissions using
ls -land change permissions usingchmod.grepis a powerful search tool with many options for customization.>,>>, and|are different ways of redirecting output.command > fileredirects a command’s output to a file whlecommand >> fileredirects a command’s output to a file without overwriting the existing contents of the file.command_1 | command_2redirects the output of the first command as input to the second command.forloops are used for iteration.basenamegets rid of repetitive parts of names.Scripts are a collection of commands executed together.
Class Exercise Solutions
Exercise: Solutions
Exercise 1: Solution
rm -r backup
cp SRR098026.fastq SRR098026-backup.fastqandcp SRR097977.fastq SRR097977-backup.fastq
mkdir backupandmv *-backup.fastq backupchmod -w backup/*-backup.fastq
It’s always a good idea to check your work withls -l backup. You should see something like:-r--r--r-- 1 dcuser dcuser 47552 Nov 15 23:06 SRR097977-backup.fastq -r--r--r-- 1 dcuser dcuser 43332 Nov 15 23:06 SRR098026-backup.fastqExercise 2: Solution
grep -B1 GNATNACCACTTCC SRR098026.fastq@SRR098026.245 HWUSI-EAS1599_1:2:1:2:801 length=35 GNATNACCACTTCCAGTGCTGANNNNNNNGGGATG
grep -B1 AAGTT *.fastqSRR097977.fastq-@SRR097977.11 209DTAAXX_Lenski2_1_7:8:3:247:351 length=36 SRR097977.fastq:GATTGCTTTAATGAAAAAGTCATATAAGTTGCCATG -- SRR097977.fastq-@SRR097977.67 209DTAAXX_Lenski2_1_7:8:3:544:566 length=36 SRR097977.fastq:TTGTCCACGCTTTTCTATGTAAAGTTTATTTGCTTT -- SRR097977.fastq-@SRR097977.68 209DTAAXX_Lenski2_1_7:8:3:724:110 length=36 SRR097977.fastq:TGAAGCCTGCTTTTTTATACTAAGTTTGCATTATAA -- SRR097977.fastq-@SRR097977.80 209DTAAXX_Lenski2_1_7:8:3:258:281 length=36 SRR097977.fastq:GTGGCGCTGCTGCATAAGTTGGGTTATCAGGTCGTT -- SRR097977.fastq-@SRR097977.92 209DTAAXX_Lenski2_1_7:8:3:353:318 length=36 SRR097977.fastq:GGCAAAATGGTCCTCCAGCCAGGCCAGAAGCAAGTT -- SRR097977.fastq-@SRR097977.139 209DTAAXX_Lenski2_1_7:8:3:703:655 length=36 SRR097977.fastq:TTTATTTGTAAAGTTTTGTTGAAATAAGGGTTGTAA -- SRR097977.fastq-@SRR097977.238 209DTAAXX_Lenski2_1_7:8:3:592:919 length=36 SRR097977.fastq:TTCTTACCATCCTGAAGTTTTTTCATCTTCCCTGAT -- SRR098026.fastq-@SRR098026.158 HWUSI-EAS1599_1:2:1:1:1505 length=35 SRR098026.fastq:GNNNNNNNNCAAAGTTGATCNNNNNNNNNTGTGCG
4.13 Additional Information
4.13.1 Uploading and Downloading Data to your Virtual Machine with scp - UNIX
This section is for your general knowledge.
scp stands for ‘secure copy protocol’, and is a widely used UNIX tool for moving files
between computers. The simplest way to use scp is to run it in your local terminal,
and use it to copy a single file:
In terminal,you can use the scp command to upload a file (e.g. local_file.txt) to the cluster home directory:
If you wanted to download data from your virtual machine, we would put the location of the folder within the virtual machine in the location of
4.14 More ways to work with files
4.14.1 Awk
Awk is a fast and versatile pattern matching programming language. Awk can do the same tasks that sed, grep, cat, and wc; and then it can do a lot more https://www.gnu.org/software/gawk/manual/gawk.html. This program deserves a full class to go into details, so instead we just have this section to make you aware that the program exists.
Let’s see how awk can behave like wc.
This table is from the Bay et al. 2017 publication TableS2_QTL_Bay_2017.txt and we will use it as our example file for this section.
We can look inside the file by using cat or awk
The instructions are enclosed in single quotes
This command has the same output of “cat”: it prints each line from the example file TableS2_QTL_Bay_2017.txt
The structure of the instruction is the following: - curly braces surround the set of instructions - print is the instruction that sends its arguments to the terminal - $0 is a variable, it means “the content of the current line”
As you can see, the file contains a table.
Trait   n   LOD Chr Position (cM)   Nearest SNP
mate choice 200 4.5 14  22.43   chrXIV:1713227
mate choice     200 4.61    21  8   chrXXI:9373717
discriminant function   200 4.83    12  17  chrXII:7504339
discriminant function   200 4.23    14  8.1 chrXIV:4632223
PC2 200 4.04    4   30.76   chrIV:11367975
PC2 200 6.67    7   47  chrVII:26448674
centroid size   200 6.97    9   47.8    chrIX:19745222
x2* 200 3.93    7   60  chrUn:29400087
y2* 200 9.99    4   32  chrIV:11367975
x3  200 4.45    1   32.3    chrI:15145305
x4  200 5.13    16  30.9    chrXVI:12111717
x5* 200 4.54    15  6   chrXV:505537
y5  200 4.21    4   24.9    chrIV:15721538
x6  200 3.96    16  29.5    chrXVI:13588796
y6* 200 4.14    9   30.2    chrIX:18942598
y15*    200 5.3 2   27  chrII:19324477
x16 200 5.49    7   60  chrUn:29400087
x17     200 4.92    1   32.8    chrI:14261764
Table S2. Significant QTL loci for mate choice and morphology
Now let’s use awk to count the lines of a file, similarly to what wc -l would do.
As you probably remember, -l is an option that asks for the number of lines only.
However, wc counts the number of newlines in the file, if the last line does not contain a carriage return (i.e. there is no emptyline at the end of the file), the result is going be the actual number of lines minus one.
A workaround is to use awk. Awk is command line program that takes as input a set
of instructions and one or more files. The instructions are executed on each line
of the input file(s).
Awk can also search within a file like grep can. Let’s see if there are any significant QTL loci in the chromosome “chrXIV”
This chromosome had two significant QTL Loci for mate choice and morphology.
When to use awk?
- for search and replacement of large files (it’s fast!)
- when manipulating multiple large files